Lab.2 Intallation Mikrotik

The Purpose
1.
Knowing
more about Mikrotik
2.
Knowing
a step installation Mikrotik with GNS3
The Basic Concept
“The History of Mikrotik”
Mikrotik
is a Small company in Latvia, side by side with Rusia. The formed by John
Trully and Arnis Riekstins. John Trully is an American who immigration to
Latvia. In Latvia, he meet with Arnis Riekstins a undergarduate Physics and
Mechanic about 1995. In 1996 John and Arnis to start with the system Linux and
MS DOS that combined with technology Wireless LAN (W-LAN) Aeronet speed 2Mbps
in Moldova. It was only then serve five customers in Latvia, because ambition
they are making one equipment soft routers that are reliable and distributed
throughtout the world.
The
basic principle they’re not making Wireless ISP (W-ISP), but make program a
router that are reliable and can run around the world. Latvia only a test site
John and Arnis, because when this they’ve been helping the country – other
countries, including positions that serve about 400 users. Linux that they use
the first time is kernel 2.2, that the developed jointly with the 5-15 people
on the Research and Development (R&D). According to Arnis, in addition to
the staff in the environment Mikrotik. They also recruiting the power off and
the third that with intensive development Mikrotik in the marathon.
Installation Mikrotik
After doing
installation mikrotik in GNS3, prepare the materials is needed, is :
1.
File
image / Iso. (This file image / iso must one folder with system folder of GNS3)
2.
GNS3
that installed.
1.
Input
file iso to folder GNS3 system.

2.
Click
button Start. Search CMD, button right choose Run
Administrator.

3.Get
in the windows with typing an order cd .. and then, button Enter.
If already, typing again order cd .. .

4. And
then, typing order cd “Program Files” to get into the program
files on the system. If already, get into GNS3 system with the order cd GNS3,
the next button enter.

5. Type
in order as below. And on the syntax mikrotik.img , that is the
name of the file image.
6. Then,
type in order as below. On the syntax mikrotik-5.20-cracked.iso
suitable with name of iso file. Button enter.
7. Wait
a sometime.

8. If a
select all with the order a, if select one with spacebar.

9. If
already, button enter.

10. Button
order y.
11. Button
order y again.
12. Wait.
This is load the installation.
13. On
the GNS3, choose option edit > preferences. Then, button
option Test Settings.

14. If
it successful, it comes the writing color green as under this.

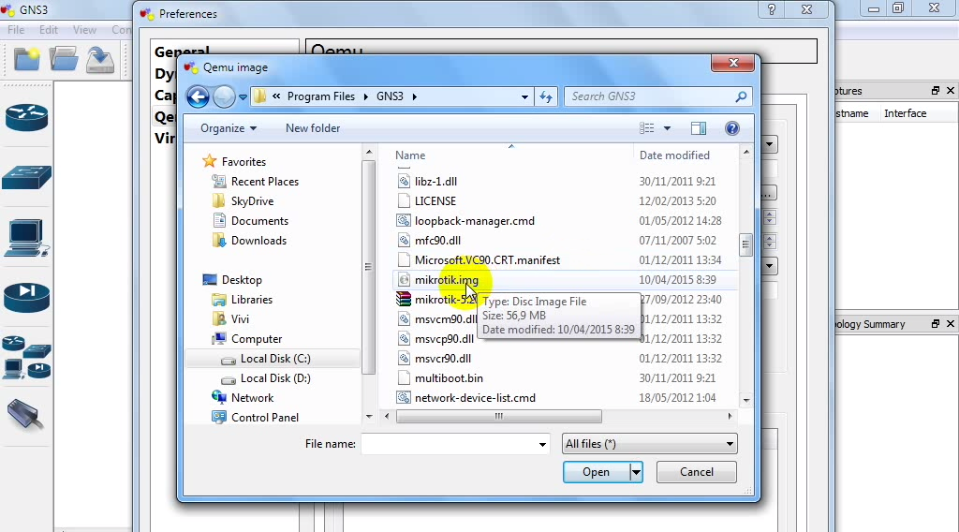
15. Click option browse us under this.

16. Get
in the file image.
17. If it
has filled all, click save, then OK.

18. On
the symbol manager.

19. Choose
router, then press the arrow to the right.

20. Change
the name of a router to mikrotik, and in the choice of type, choose qemu
guest. If it has, press apply.

21. Then,
save it.

22. Click
right on the mikrotik, choose start.

23. Finish...
installation mikrotik has been success.


